
SyncWith Engineering
Building a free on-the-fly image optimization pipeline with Cloudflare and Cloudinary
Last updated: May 10th, 2023

Alex Black
Co-Founder / CEO
TL;DR: In an effort to ensure our technical SEO was top notch, we wanted to make sure our website images were highly optimized to reduce page load times. In this article I am going to share how we built a solution that drastically reduced image sizes across our website using free plans from Cloudflare Workers and Cloudinary. If you're a web developer, you can take our sample code and have your website's images optimized in no time, without any changes to your website or webapp.
Introduction
We'd been building our product and website for a while when we started to focus on SEO. Obviously great content is one of the most important aspects of SEO, but we wanted to make our site's technical SEO was really strong. One of the issues we identifed was that many of the images used on our site were well over 100kb, many were much larger, and we were worried that large file sizes would impact page load times and ultimately have a potential negative impact on our site's ranking in the search engines.
It took us a few attempts to land on a solution we were happy with, so I'm going to share it here in detail, so you learn from it and consider implementing something similar yourself.
If you're eager, feel free to jump right to the sample code on GitHub.
Image Optimization Challenges
Large File Sizes: If you're not careful, images can end up being large, we often feature screenshots of our product, or large header images, and found they often ended up being 100kb, or 200kb or more.
One-Size-Fits-All: We also realized that serving up the same size (unscaled) images to users on different devices can lead to slow load times and a subpar experience. Why send a massive image to a mobile user when a smaller one would suffice?
Modern Image Formats: I've been working in web development for a long time now, and JPG and PNG aren't the only options now. I tested saving a few of our images as WebP (instead of PNG) and got much smaller file sizes, so I was excited to use modern formats like WebP and AVIF everywhere if possible.
Video Optimization: Our site also had a fair number of what example videos that were published as animated GIFs, and unfortunately they're really large, and not a great user experience. I was hoping I could find a way to easily serve them as proper videos (with playback controls) and without the large download sizes.
Delay Loading and Poster Images: As I investigated switching our videos from animated GIFs to videos using WebM, I realized that a great solution woudl be to ensure the videos delay load, so that users don't need to pay the download cost unless they actually start watching.
Common Image Optimization Approaches
Do nothing: This is what we'd been doing up until this point. We didn't have an official set of practices to ensure images were optimzed, I think we generally thought about it, and tried to choose an appropriate format, but we hadn't been using WebP or AVIF out of concern that not all browsers used them.
Manual optimization: We'd inconsistently been doing some manual optimization, its a bit of a pain. Usually if I remembered I'd upload images to TinyPNG or similar sites then download the optimized verison and use that.
Build step optimization: Automating image optimization during your build process can help, but you'll need to put in the work to configure and manage everything.
External services: Uploading images to an external service can streamline optimization, but it can also introduce new complexities and reliance on third-party services.
Our final solution: Cloudflare Workers + Cloudinary
After trying a few options, we landed on a solution that's been working great for us. It uses CloudFlare workers and Cloudinary, both of which offer generous free plans, and most importantly it fits our philosophy making things automatic, so we don't have to think about them or waste time doing things manually.
We're using two innovative tools that I love using: Cloudflare Workers and Cloudinary's fetch feature to automatically optimize images on the fly. CloudFlare workers is a service that lets you run code front of your website, seamlessly with very low latency, and it let's us serve up optimized images on the fly without any manual steps. Our Cloudflare worker then uses Cloudinary to produce the actual optimized images. What I love about CLoudinary's fetch feature is that you don't have to upload any images, instead it requests the original image from your site as needed.
For our lazy (and high performing) solution, I was looking meet these requirements:
- Newly added images are optimized with no additonal steps (no uploading required, no manual optimization)
- Serve images from the same domain name (avoid additional DNS lookup and HTTPS connect time)
- Avoid hardcoding image dimensions or quality
- Minimal resources/accounts/servers to setup and manage
Background
First, in case you're not already familiar with Cloudflare, Cloudflare workers and Cloudinary:
Cloudflare is one of the world's largest web infrastructure companies. They started as a "dumb" content delivery network whose goal was to enable SSL for the world's websites. In the years since, they've rolled out many "smart" features that run directly on Cloudflare's edge network. One example is Workers, which lets developers run code close to users, reducing latency and ensuring speedy responses. . Workers are an ideal tool for our problem, because they can run seamlessly in front of our website, at the edge, with no delay or impact at all. Workers are also just amazing all around, and I highly recommend you check them out, setting up an image pipeline like this is just a small example of the type of things you can use them for.
Cloudinary, on the other hand, is a leading cloud-based platform specializing in image and video management. It offers an array of features like image optimization, transformation, and delivery, making it an invaluable tool for developers who want to streamline their media handling process. I think you'll find Cloudinary to be an incredibly versitile tool, in this article we barely scratch the surface of what it can do with images and video.
Setup
To get this setup, you'd first need to get a free account at each of Cloudflare and Cloudinary. There isn't setup or config required at Cloudinary, everything should just work out of the box. At Cloudflare there is some setup in involved, the key steps are:
- Moving your domain's DNS to Cloudflare, so that Cloudflare can sit in front of your website, see this full setup article at Cloudflare
- Creating a worker, and assigning it to your website under an HTTP route
This will give you the ability to deploy a worker in front of your website. In this solution the worker will ignore most requests, and handle just requests for images, so they can be optimized before the user sees them.
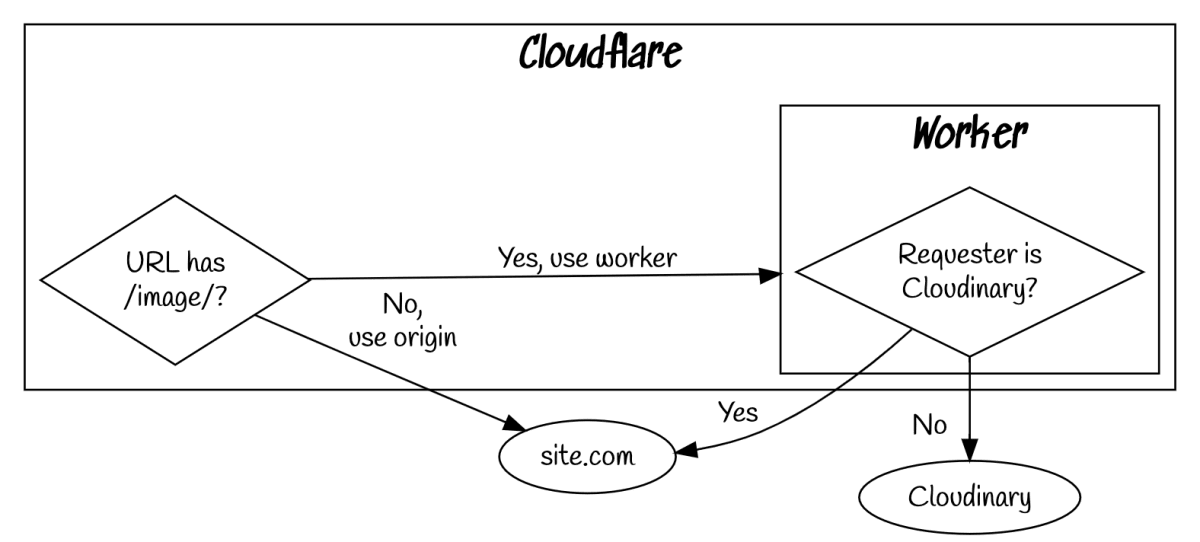
On-the-fly Image Pipeline
What makes this solution really hum is that you can set it up without changing any of your code, and once it's working, it just works. Your images are going to be lightning fast, fully optimized, with no tradeoffs such as serving images from another domain, or having long complicated image filenames, or having to do any manual work.
Here's an example showing the flow of how this all works:
- A user visits your website
- The user's browser requests an image from your website, for example: https://site.com/images/logo.jpg
- The Cloudflare worker intercepts the request, notices that this is a request in the /images path, so it should be handled
- The Cloudflare worker determines the Cloudinary options for this image request, based on the image's format, device type, and user-agent capabilities, in this case q_auto:good to tell Cloudinary to set the image quality (and file size) automatically, c_limit, w_1200 tells Cloudinary to scale the image down (but never up) if necessary to ensure its at most 1200 pixels wide, and finally f_webp to tell Cloudinary to deliver the image in WebP format if the user's browser supports it
- The Cloudflare worker composes a request to Cloudinary to fetch an optimized version of this image, for example:
https://res.cloudinary.com/your-cloud/image/fetch/q_auto:good,w_1200,f_webp/https://site.com/images/logo.jpg - Cloudinary receives the request, if it doesn't yet have a copy of the image, it requests it at its url https://example.com/images/logo.jpg, but specifying the Cloudinary user-agent so that the CloudFlare worker can return the original image, otherwise Cloudinary pulls the image from its CDN
- If Cloudinary hasn't yet produced the requested image transformation, it processes the image to produce the optimized image, caches it, and returns it
- The Cloudflare worker receives the optimized image from Cloudinary and returns it to the user's browser, seamlessly
Example Results
Lets take a look at the big header image on this page (at the top!), and see the impact here. Note: this is a rather extreme example, the original image is straight from Midjourney, and seems to be exceptionally large at 1.6mb. But, I was able to just drop it in to our website, and not worry about it!
| Image | Format | Dimensions | File size | Reduction |
|---|---|---|---|---|
| Original | PNG | 1536 x 768 | 1.6mb | |
| Desktop | WebP | 1200 x 600 | 36.3kb | 97.7% |
| Mobile | WebP | 640 x 320 | 18.2kb | 98.8% |
Implementing the Cloudflare Worker
First, we'll use Cloudflare Workers to intercept image requests. We'll check if the request should be handled by Cloudinary by looking at the request path and user-agent header. If it's an image request and not from Cloudinary, we'll create a new request to fetch the optimized image from Cloudinary.
Here's the relevant code snippet for this:
if (isImageRequest(request) && !isCloudinaryRequest(request)) {
const imageRequest = new Request(
getImageOriginUrl(env, request),
request
);
// Call the default Cloudflare fetch method to get the image from Cloudinary
return fetch(imageRequest);
} else {
// Ask Cloudflare to fetch the request from the origin
return fetch(request);
}Next up, we'll use the Cloudinary SDK to transform images based on the requesting device type, user-agent capabilities, and specific query parameters. Cloudinary will then deliver the optimized image in the most suitable format for the user. We'll make use of the User-Agent header to detect if the user's browser supports modern formats like WebP or AVIF.
Here's a code snippet that shows how to detect the user-agent capabilities:
export const getUserAgentCapabilities = (
req: Request
): UserAgentCapabilities => {
const capabilities: UserAgentCapabilities = {
webp: false,
avif: false,
};
const accept = req.headers.get(ACCEPT_HEADER);
if (accept && accept.toLowerCase().indexOf(mimeTypeWEBP) >= 0) {
capabilities.webp = true;
}
if (accept && accept.toLowerCase().indexOf(mimeTypeAVIF) >= 0) {
capabilities.avif = true;
}
return capabilities;
};With the user-agent capabilities at hand, we can now generate Cloudinary transformation options based on the original image format, device type, and whether or not the user's browser supports modern image formats. We'll also handle special cases, such as generating a poster image from a video or converting an animated GIF to a WEBM video.
Check out this code snippet that handles generating the transformation options:
const getImageOutputOptions = (
request: Request,
format: ImageFormat | undefined,
capabilities: UserAgentCapabilities
): string[] => {
// ... (handling specific format requests and poster generation)
const options: string[] = [];
if (format === "gif") {
// we handle animated GIFS differently for now, try to aggressively optimize them for quality
options.push("fl_lossy");
options.push("q_50");
} else {
// scale images down (but never up)
options.push("c_limit");
const deviceType = getDeviceType(request);
// Choose a max width based on deviceType
if (deviceType === "mobile") {
options.push("w_640");
} else if (deviceType === "tablet") {
options.push("w_960");
} else {
options.push("w_1200");
}
// Let Cloudinary optimize the image for quality
options.push("q_auto:good");
// if we know what format it is (and its not GIF) then we can optimize it
if (format) {
if (capabilities.avif) {
options.push("f_avif");
} else if (capabilities.webp) {
options.push("f_webp");
} else if (format === "webp" || format === "avif") {
// Downgrade from modern formats to PNG if not supported
options.push("f_png");
}
}
}
return options;
}And that's it! By combining Cloudflare Workers and Cloudinary, we've created a flexible, on-the-fly image optimization solution that caters to different devices and browsers. No more manual optimizations, build steps, or one-size-fits-all approaches. Our users get the best image quality and format, and we get to enjoy faster load times and improved SEO. Win-win!
A Cost-Effective Solution: Embracing Free Plans
One of the great things about our image optimization approach is that it can be implemented using free plans from both Cloudflare and Cloudinary, making it a cost-effective solution for many websites. Let's dive into the details of these free plans and how they can fit your needs.
Our site syncwith.com does about 25,000 pageviews each month, and 17,000 sessions. It has about 100 pages, with 400 unique image and video assets. I imagine you could host significantly bigger sites on these free tiers!
Cloudflare's Free Plan and Free Workers Plan
Cloudflare offers a free plan that provides basic DDoS protection, a shared SSL certificate, and access to a global CDN. This plan is suitable for personal websites or blogs that don't require advanced features. As far as I can see the free plan doesn't have any quotas or limits related to requests or bandwidth.
In addition to the free plan, Cloudflare also offers a free workers plan, which allows you to build and deploy serverless applications using Cloudflare Workers. The free tier includes:
- 100,000 requests per day
- 30 Worker scripts
- 10ms CPU time per request
- Runs on all 275+ network locations worldwide
For many small to medium-sized websites, these limits should be sufficient to handle image optimization tasks without incurring any costs at all.
Cloudinary's Free Plan
Cloudinary also offers a generous free plan, which provides the following:
25 monthly credits (1 credit = 1,000 transformations or 1 GB of storage or 1 GB of net viewing bandwidth)
- 25 GB of managed storage
- OR 25 GB of monthly net viewing bandwidth
- OR 25,000 transformations per month
To put these limits in context, we've been using this approach at syncwith.com for the past 3 weeks, and we've used 5,300 image transformations, 107.26mb of bandwidth, and 108.52 mb of storage. Which means we've used just 22% of our free monthly credits, if we extrapolate we'll use about 26% of the free tier quota. I actually expect we'll use less than this in the following months since Cloudinary has already transformed all of our images, and in the future we'd only need to transform new images added to the site.
What I saw is that during the first month these limits can comfortably accommodate a variety of websites, including personal blogs, portfolios, and small businesses, allowing them to optimize images without spending a dime.
Conclusion
Image optimization doesn't have to be a massive headache, or break the bank. By leveraging the power of Cloudflare Workers and Cloudinary's cloud SDK and free plans, we can automatically optimize images to deliver the best possible experience to our users.
Some Alternative Approaches
There are many approaches and solutions to image optimization. Here are a few that I looked at:
TinyPING:
Before embarking on this project I was primarily ignoring image size, unless I noticed the image size was really large, then I typically used TinyPNG to compress images. This is a great tool, and I find it really helps get image sizes down, but its some effort to use it (and to remember to use it) on every image. I then realized I should be using WebP images, but wanted to still offer PNG for browers that don't support WebP, so I started using <picture> elements, which let you provide multiple formats of an image, but again this is more work, producing WebP and PNG formats of every image.
Cloudflare Images:
Cloudflare says Cloudflare Images lets you set up an image pipeline in minutes. Build a scalable image pipeline to store, resize, optimize and deliver images in a fast and secure manner., and I'm sure it works well, but one of our key requirements was that we didn't want to upload images (manually, or automatically), we wanted an on-demand image pipeline!
Cloudflare Image Resizing:
yes Cloudflare has more than one image solution...With Image Resizing, you can transform images on Cloudflare’s edge platform. You can resize, adjust quality, and convert images to WebP or AVIF format on demand. Cloudflare will automatically cache every derived image at the edge, so you only need to store one original image at your origin.I tried this out, and I wanted it to work... I used it with a Cloudflare worker, and it was pretty good, but I hit two limitations that I wasn't happy with:
- When requesting an image, image compression (optimization) doesn't get applied unless you've requested the image be scaled or transformed to a new format. This meant that some images wouldn't get optimized, and their file size would be larger than we wanted.
- We were not able to fit our website's traffic usage in the free plan, the number of transofrmations needed was too high. This was a key issue that caused me to try Cloudinary, because I knew with Cloudinary that once you've requested an image transformation it won't count towards your quota again, whereas with Cloudflare it seemed every request counted
Cloudinary without a Cloudflare worker:
Yes Cloudinary is a standalone service, and you can use it without a Cloudflare worker. In my opinion, it gets better when used with a worker, because we can then serve the images from our own domain, avoiding additional DNS and HTTPs connect time. Also, we can specify the image transforms once, in the worker, and keep simple (hopefully SEO friendly) image URLs in our HTML. Another limitation here is that without the worker we'd have to do something special to serve device-specific image sizes.
Responsive image elements:
HTML has built in support for responsive image sizes, so we could have used it, to specify the three image sizes we're using (desktop, tablet, mobile), and separately we could have used the <picture> element to specify the WebP and PNG formats, but it gets a bit involved, and you still need a way to generate all these image variations, in this example it'd be 6 images per image. I found an article on responsive images done right which shows how to handle multiple image sizes and formats properly. Again this probably works well, but for our solution I didn't want to have to go and modify existing HTML or images on the site, nor did I want any additional work as new images are added, and I wanted to be 100% sure that my solution would work on all browsers.
Looking for the code?
I've published the code for this solution on GitHub, it's a Cloudflare worker, written in Typescript